Creating an AI Resource Deployment
Once authenticated:
- You’ll be directed to the Create AI Resource form
- From here, you can select region, subscription and resource group created earlier
- The wizard will auto-detect available subscriptions and resource groups tied to the signed-in user
If using an Azure Administrator account, or a user with the Contributor role, resource groups can be created directly from this interface — no need to pre-create them in the Azure Portal.
The flow is linear and guided, with each field unlocking the next based on prior selections.

Provider
- Selects the AI provider. Currently only Azure OpenAI is supported.
Region
- Specifies the Azure region where the AI resource will be deployed.
- Select the region where the resource group was created.
Subscription
- Selects the Azure subscription in your tenant for billing purposes.
- Determines which resource groups and OpenAI resources are available. This is a required field.
Resource Group
- Chooses the Azure resource group to host the OpenAI resource.
- Populated based on the selected subscription and region.
⚠️ Important Notes:
- Creating a new resource group via the Admin UI requires the Contributor role in Azure. Since this is a privileged role, it’s recommended to create the resource group manually during the prerequisites setup phase.
- Naming Restrictions: Resource group names must be 2–62 characters, use alphanumeric characters, underscores, parentheses, hyphens, and periods, and must end with an alphanumeric character.
OpenAI Resource Name
- Specifies the name of the Azure OpenAI resource.
- Can reference an existing resource or trigger creation logic. Must be valid within the selected resource group.
Naming Restrictions:
- Must be 3–24 characters.
- Lowercase letters, numbers, and hyphens only.
- Must start with a letter and end with a letter or number.
- No consecutive hyphens or special characters.
Deployment Name
- Defines the name for the model deployment.
- To create a new model deployment, click “Create New”

- Select the desired model. The list will display models available in the selected Azure region. As of this guide’s creation, the recommended model is “gpt-4.1-mini,” which is cost-effective and well-balanced for Revelation AI purposes. Model availability may change over time, so click here for the most up-to-date information.
- Enter a custom deployment name or leave it blank to use the recommended name revelation-openai-<model name>.
Naming Restrictions:
- Must be 2–62 characters.
- Lowercase letters, numbers, and hyphens only.
- Must start and end with a letter.
- Avoid spaces and special characters.
Model Name
- Displays the model name for the selected deployment. Useful when selecting an existing deployment.
Capacity Settings
- Use the “Capacity (Requests per minute)” slider to set the maximum throughput for your Azure model deployment, ranging from 0 to 200 RPM.
- Start with a lower number eg. 50 RPM, and increase it if needed at a later stage.
- This value directly determines the “Corresponding Tokens per minute” limit, which is always calculated as RPM × 1,000. For example, setting the slider to 50 RPM will allow up to 50,000 tokens per minute. These two limits are intrinsically linked and help manage both cost and performance. Adjust the slider based on your expected usage and budget.
System Default
- Sets this model as the default for system-wide AI usage. There can be only 1 system default model deployment.
- Setting the deployment as the system default will automatically unset the existing system default (if set).
Deploy Model
- Validates all fields and initiates deployment of the selected OpenAI model settings.
- Button is disabled until all required fields are filled.
Model Deployments
After a successful deployment, Revelation AI redirects the admin to the Deployments Page, which lists all AI model deployments.
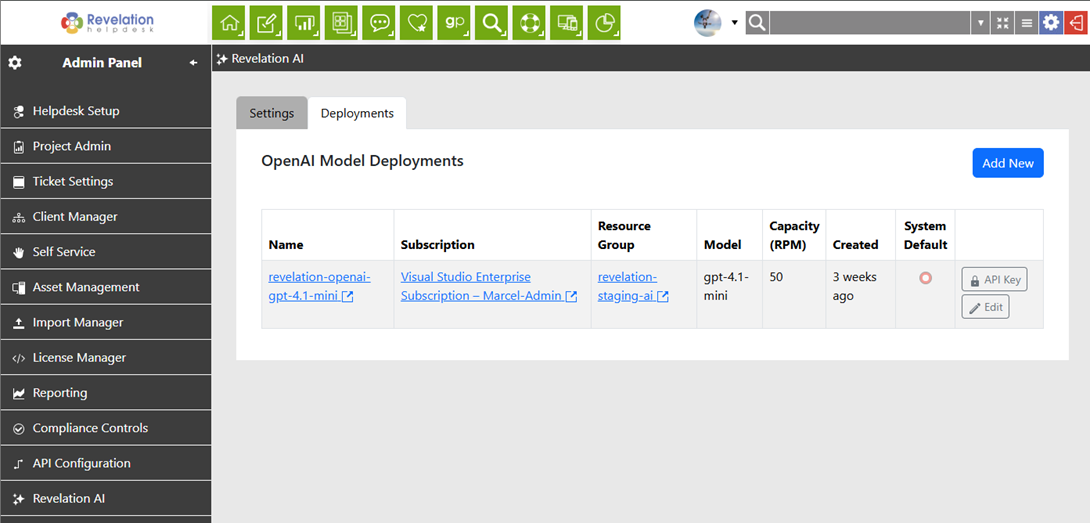
Overview
| Column | Description |
| Name | Clickable link to the Azure OpenAI deployment (Azure AI Foundry) |
| Subscription | Clickable link to Azure subscription in the Azure portal. |
| Resource Group | Linked resource group |
| Model | Model name (e.g., gpt-4-1-mini) |
| Capacity (TPM) | Token-per-minute allocation |
| System Default | Indicates if this model is the default model for AI functionality |
Use the Add New button to deploy additional or new models.
Available Actions
Each deployment row includes two key actions:
| Action | Description |
| Edit | Modify deployment details such as TPM tier or deploy a newer model to the existing Open AI account. |
| API Key | Launches a dialog to update the API key used to connect to the Model deployment |
API Key Management Dialog
Clicking API Key opens a modal where admins can enter a new Azure OpenAI API key. Use the link in the modal dialog to navigate to Azure Foundry, then copy the API key and paste it in the test field provided.
Use Cases:
- Key Rotation: Periodic updates for security hygiene.
- Compromised Key: Replace a leaked or exposed key.
Settings
After deploying an AI model, two tabs will appear on the Revelation AI Admin page:
- Deployments – Lists all existing model deployments.
- Settings – Allows you to configure AI features within the product.
The Settings tab includes the following options:
- Revelation AI (Rai) – On/Off Switch
This is the master toggle for Revelation AI. Turning it off will disable all AI functionality across the platform interfaces. - AI Assist
Grants access to specific teams or access levels for the AI Assist feature, which provides contextual support within ticket details. - AI Edit
Grants access to specific teams or access levels for the AI Edit feature, allowing users to rewrite ticket notes to sound more professional, concise, or friendly.